Posts

How to install ifort compiler in you personal directory on University cluster/workstation

Image
In the current day superfast computer era, simulations of computationally supper expensive codes have become a reality. We all (computational scientists) use different computer languages to write our codes and many of us still use Fortran to get to do the scientific calculations. Currently, there are two compilers for Frotran codes: (1) GNU's gfortran   and, (2) Intel's ifort. While a person can use any of those but ifort has some advantages over gfortran. Here, I list a few of them as below: (1) gfortran is slower then ifort since ifort are specially written for intel prossesors (2) In gfortran , there is a limit of name of subroutine of 80 characters but in ifort there is no such limitation (3) ifort is slightly better than gfortran. In performance: for the Polyhedron benchmark, ifort is about 1.6% faster (geometric mean) on a Core2 (4) ifort is can do a much better auto-vectorization for loops that uses a large number of arrays. e.g. SIMD.   Therefore, it is useful to

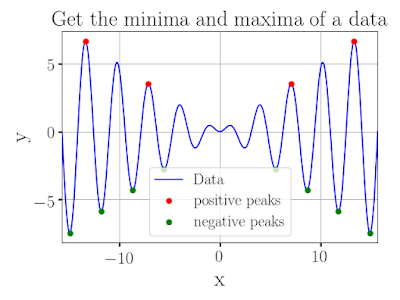
How to get a Maxima and Minima of a data

Image
How to get a Maxima and Minima of a data Many times while analysing a data, we need to get the local maxima and minima of a data. There are many algorithms to do the task. Here, I am sharing a python script to get the maxima and minima of a data file. In python, there is an inbuilt function from the scipy library to find the maxima. Following is the function: peaks_positive, _ = scipy.signal.find_peaks(y, height = 2.5, threshold = None, distance=5) In the above function,  height = User-defined number. This is the minimum height of the data to get the peaks. threshold = The vertical distance to its neighbouring samples. This number defines the minimum vertical distance between two nearby peaks.  distance = The horizontal distance to its neighbouring samples. This number defines the minimum horizontal distance between two nearby peaks. If two peaks are to close to another the lower one is removed. It is to be noted that this is not the value of the data poin

How to remove black background in animation/movies in latex Beamer

How to remove black background in animation/movies in latex Beamer Gone the days when we used overhead projectors or film projectors, in the current world, we often use the Microsoft or beamer presentation slides to show our results. For a better presentation of the data, we use animation or the movies to pass the message of the work done. In Beamer, while using   \movie[label=cells,width=5.72cm,height=6.2cm,loop,poster,showcontrol] {\includegraphics[width=5.72cm,height=6.2cm]{image.png}{movie.mp4} command, sometimes gives an annoying black background and does not look good. Here, I am providing the solution to this problem. The cause of the problem is the mismatch in the size of the image and movie (say movie.mp4 file) file. Hence, the do the following to resolve this issue: (1) Get the dimensions of the movie file by the following command: mediainfo movie.mp4 This will return the width (W) and height (H) of the movie in the units of pixels. (2) Get the dimensions

How to play movies (videos in firefox) in newly installed fedora 24

How to play movies (videos in firefox) in newly installed fedora 24 To play movies in any linux one needs gstreamer librabries. Here I am describing a way to install gstreamer along with the other libraries, which wil be useful in playing any online streaming videos in firefox. (1) type the following and type the password to become the super user of your system  user@system$ su (2) Now give the following command to add the repositories to your fedora user@system$ dnf install http://download1.rpmfusion.org/free/fedora/rpmfusion-free-release-$(rpm -E %fedora).noarch.rpm user@system$ dnf install http://download1.rpmfusion.org/nonfree/fedora/rpmfusion-nonfree-release-$(rpm -E %fedora).noarch.rpm (3) Now type the following to install the required libraries and softwares user@system$  dnf install gstreamer{1,}-{ffmpeg,libav,plugins-{good,ugly,bad{,-free,-nonfree}}} --setopt=strict=0

How to Embed mp4 movie in beamer latex presentation

How to Embed mp4 movie in beamer latex presentation. It is very important to show the real time movei to present your work effectively. During a presentation we can show the movies embedded inside the pdf version of the talk/presentation without exiting the presentation mode. Here it is written how it is done: You have to use following package to include the movie : \usepackage{multimedia} and following command to embed the movie \movie[label=cells,width=5cm,height=4cm,loop,poster,showcontrols]{\includegraphics[width=5cm,height=4cm]{File_name.eps}}{File_name.mp4} where File_name.eps is the image which you want to show as the prewiew of the movie (this can be any frame of your movie or the screen shot if you do not have the frames in advance)and File_name.mp4 is the name of the movie. You must open the pdf version of your presentation in Okular. For your help I have made a directory for you which include *.tex, *.pdf, *.eps (logo and movie preview), and  *.

How to install XPPAUT in Ubuntu-11.04, Ubuntu-12.04 and higher versions.

How to install XPPAUT in Ubuntu-11.04, Ubuntu-12.04 and higher versions.  (i.e. Ubuntu-11.04, 11.10, 12.04, 12.10, 13.04, 13.10, 14.04, 14.10, 15.04 and higher) XPPAUT is a tool for solving differential equations, difference equations, delay equations, functional equations, boundary value problems, and stochastic equations. It is very easy to use and can solve any non-linear differential equation that is very difficult by analytic method. Also unlike other low level and high level languages, it is VERY EASY TO WRITE THE CODE for differential or any other dynamic equation in XPPAUT. THE EQUATIONS ARE WRITTEN AS WE WRITE ANALYTICALLY. It can also make animation or movie of your dynamic system. It is considered as best friend of researchers working in the field of Non-linear Dynamics. XPPAUT was very easy to install in Ubuntu-10.10 or lower versions, but in 2010 Ubuntu has modified it's architecture and has introduced one new directory named as x86_64-linux-gnu (for 64 bit com

How Install XOOPIC in Ubuntu-12.04

How Install XOOPIC in Ubuntu-12.04 YOU MUST INSTALL XGRAFIX FIRST TO SEE THE GRAPHICS OF XOOPIC. You can read my previous post on installing XGRAFIX. To install XOOPIC first download " xoopic-2.70.2.tar.gz " it from  here from the download section then do the following: (1) Go to the directory containing "xoopic-2.70.2.tar.gz " and now exract it with the right click of the mouse. Now type the following commands in the terminal  (a) cd /location/of/xoopic  (b) sh run_conf.sh      (c) make  now if it gives any of the following or both   error: xgrafix.h: No such file or directory  error: libXGC250.a: No such file or directory  then type: (a) sh run_conf.sh --with-XGRAFIX-include=/usr/local/include  --with-XGRAFIX-lib=/usr/local/lib (b) make (c) sudo make install It will create an executable file called xoopic, copy this to a proper location by following command (a) sudo cp xoopic /usr/bin/ And there you are XOOPIC is instal